
Portal:History
The History Portal

History (derived from Ancient Greek ἱστορία (historía) 'inquiry; knowledge acquired by investigation') is the systematic study and documentation of human past. History is an academic discipline which uses a narrative to describe, examine, question, and analyze past events, and investigate their patterns of cause and effect. Historians debate which narrative best explains an event, as well as the significance of different causes and effects. Historians debate the nature of history as an end in itself, and its usefulness in giving perspective on the problems of the present.
The period of events before the invention of writing systems is considered prehistory. "History" is an umbrella term comprising past events as well as the memory, discovery, collection, organization, presentation, and interpretation of these events. Historians seek knowledge of the past using historical sources such as written documents, oral accounts or traditional oral histories, art and material artifacts, and ecological markers. History is incomplete and still has debatable mysteries.
Stories common to a particular culture, but not supported by external sources (such as the tales surrounding King Arthur), are usually classified as cultural heritage or legends. History differs from myth in that it is supported by verifiable evidence. However, ancient cultural influences have helped create variant interpretations of the nature of history, which have evolved over the centuries and continue to change today. The modern study of history is wide-ranging, and includes the study of specific regions and certain topical or thematic elements of historical investigation. History is taught as a part of primary and secondary education, and the academic study of history is a major discipline in universities.
Herodotus, a 5th-century BCE Greek historian, is often considered the "father of history", as one of the first historians in the Western tradition, though he has been criticized as the "father of lies". Along with his contemporary Thucydides, he helped form the foundations for the modern study of past events and societies. Their works continue to be read today, and the gap between the culture-focused Herodotus and the military-focused Thucydides remains a point of contention or approach in modern historical writing. In East Asia a state chronicle, the Spring and Autumn Annals, was reputed to date from as early as 722 BCE, though only 2nd-century BCE texts have survived. The title "father of history" has also been attributed, in their respective societies, to Sima Qian and Ibn Khaldun. (Full article...)
 Featured articles –
-

USS Missouri (BB-63) is an Iowa-class battleship built for the United States Navy (USN) in the 1940s and is a museum ship. Completed in 1944, she is the last battleship commissioned by the United States. The ship was assigned to the Pacific Theater during World War II, where she participated in the Battles of Iwo Jima and Okinawa and shelled the Japanese home islands. Her quarterdeck was the site of the surrender of the Empire of Japan, which ended World War II.
After World War II, Missouri served in various diplomatic, show of force and training missions. On 17 January 1950 the ship ran aground during high tide in Chesapeake Bay and after great effort was re-floated several weeks later. She later fought in the Korean War during two tours between 1950 and 1953. Missouri was the first American battleship to arrive in Korean waters and served as the flagship for several admirals. The battleship took part in numerous shore bombardment operations and also served in a screening role for aircraft carriers. Missouri was decommissioned in 1955 and transferred to the reserve fleet (also known as the "Mothball Fleet"). (Full article...) -
The Fusō-class battleships (扶桑型戦艦, Fusō-gata senkan) were a pair of dreadnought battleships built for the Imperial Japanese Navy (IJN) before World War I and completed during the war. Both patrolled briefly off the coast of China before being placed in reserve at the war's end. In 1922 Yamashiro became the first battleship in the IJN to successfully launch aircraft.
During the 1930s, both ships underwent a series of modernizations and reconstructions. Fusō underwent her modernization in two phases (1930–33, 1937–41), while Yamashiro was reconstructed from 1930 to 1935. The modernization increased their armor, replaced and upgraded their machinery, and rebuilt their superstructures into the distinctive pagoda mast style. Despite the expensive reconstructions, both vessels were considered obsolescent by the eve of World War II, and neither saw significant action in the early years of the war. Fusō served as a troop transport in 1943, while Yamashiro was relegated to training duty in the Inland Sea. Both underwent upgrades to their anti-aircraft suite in 1944 before transferring to Singapore in August 1944. (Full article...) -
laterwork= (Full article...)


.jpg)
Gaulois was one of three Charlemagne-class pre-dreadnought battleships built for the French Navy (Marine Nationale) in the mid-1890s. Completed in 1899, she spent most of her career assigned to the Mediterranean Squadron (Escadre de la Méditerranée). The ship accidentally rammed two other French warships early in her career, although neither was seriously damaged, nor was Gaulois.
Following the outbreak of World War I in August 1914, Gaulois escorted troop convoys from French North Africa to France for a month and a half. She was ordered to the Dardanelles in November 1914 to guard against a sortie into the Mediterranean by the ex-German battlecruiser Yavuz Sultan Selim. In 1915, Gaulois joined British ships in bombarding Ottoman fortifications. She was badly damaged during one such bombardment in March and had to beach herself to avoid sinking. She was refloated and sent to Toulon for permanent repairs. Gaulois returned to the Dardanelles and covered the Allied evacuation in January 1916. She was en route to the Dardanelles after a refit in France when she was torpedoed and sunk on 27 December by a German submarine; four crewmen were lost. (Full article...)

Lieutenant General Sir Frank Horton Berryman, KCVO, CB, CBE, DSO (11 April 1894 – 28 May 1981) was an Australian Army officer who served as a general during the Second World War. The son of an engine driver, he entered Duntroon in 1913. His class graduated early after the First World War broke out, and he served on the Western Front with the field artillery. After the war, he spent nearly twenty years as a major.
Berryman joined the Second Australian Imperial Force (AIF) on 4 April 1940 with the rank of full colonel, and became General Staff Officer Grade 1 (GSO1) of the 6th Division. He was responsible for the staff work for the attacks on Bardia and Tobruk. In January 1941, Berryman became Commander, Royal Artillery, 7th Division, and was promoted to brigadier. During the Syria-Lebanon campaign, he commanded "Berryforce". He returned to Australia in 1942, becoming Major General, General Staff, of the First Army. Later that year, he became Deputy Chief of the General Staff under the Commander in Chief, General Sir Thomas Blamey, who brought him up to Port Moresby to simultaneously act as chief of staff of New Guinea Force. Berryman was intimately involved with the planning and execution of the Salamaua–Lae campaign and the Huon Peninsula campaign. In November 1943 he became acting commander of II Corps, which he led in the Battle of Sio. In the final part of the war, he was Blamey's representative at General of the Army Douglas MacArthur's headquarters and the Australian Army representative at the Japanese surrender in Tokyo Bay. (Full article...)
.jpg)
George I (George Louis; German: Georg Ludwig; 28 May 1660 – 11 June 1727) was King of Great Britain and Ireland from 1 August 1714 and ruler of the Electorate of Hanover within the Holy Roman Empire from 23 January 1698 until his death in 1727. He was the first British monarch of the House of Hanover.
Born in Hanover to Ernest Augustus and Sophia of Hanover, George inherited the titles and lands of the Duchy of Brunswick-Lüneburg from his father and uncles. In 1682, he married his cousin Sophia Dorothea of Celle, with whom he had two children; he also had three daughters with his mistress Melusine von der Schulenburg. George and Sophia Dorothea divorced in 1694. A succession of European wars expanded George's German domains during his lifetime; he was ratified as prince-elector of Hanover in 1708. (Full article...)

Lawrence Carthage Weathers, VC (14 May 1890 – 29 September 1918) was a New Zealand-born Australian recipient of the Victoria Cross, the highest award for gallantry in battle that could be awarded to a member of the Australian armed forces at the time. His parents returned to their native South Australia when Weathers was seven, and he completed his schooling before obtaining work as an undertaker in Adelaide. He enlisted as a private in the Australian Imperial Force (AIF) in early 1916, and joined the 43rd Battalion. His unit deployed to the Western Front in France and Belgium in late December. After a bout of illness, Weathers returned to his battalion in time to take part in the Battle of Messines in June 1917, during which he was wounded. Evacuated to the United Kingdom, he rejoined his unit in early December.
Promoted to lance corporal in March 1918, Weathers fought with his battalion during the German spring offensive, but was gassed in May and did not return to his unit until the following month. He participated in the Battle of Hamel in July, the Battle of Amiens in August, and the Battle of Mont Saint-Quentin in September. At Mont Saint-Quentin he was recommended for the award of the Victoria Cross. Promoted to temporary corporal, he was mortally wounded in the head by a shell on 29 September during the Battle of St Quentin Canal, and died soon after, unaware that he was to receive the Victoria Cross, which was not announced until late December. Until 2016, his Victoria Cross was in private hands, but in that year it was purchased at auction and donated to the Australian War Memorial in Canberra, where it is displayed in the Hall of Valour. (Full article...)

Abberton Reservoir is a pumped storage freshwater reservoir in eastern England near the Essex coast, with an area of 700 hectares (1,700 acres). Most of its water is pumped from the River Stour. It is the largest body of freshwater in Essex.
Constructed between 1935 and 1939, Abberton Reservoir is owned and managed by Essex and Suffolk Water, part of Northumbrian Water Group, and lies 6 km (3.7 mi) south-west of Colchester near the village of Layer de la Haye. In World War II, the reservoir was mined to deter invading seaplanes, and it was used by the RAF's No. 617 Squadron ("The Dam Busters") for practice runs for the bombing of the German dams in the Ruhr. A project to increase the capacity of Abberton Reservoir to 41,000 megalitres (9.0×10⁹ imp gal) by raising its bank height was completed in 2013, along with a new link to transfer water from Norfolk's River Ouse to the Stour. (Full article...)
_trsp.png)
In 1948, Harry S. Truman and Alben W. Barkley were elected president and vice president of the United States, defeating Republican nominees Thomas E. Dewey and Earl Warren. Truman, a Democrat and vice president under Franklin D. Roosevelt, had ascended to the presidency upon Roosevelt's death in 1945. He announced his candidacy for election on March 8, 1948. Unchallenged by any major nominee in the Democratic primaries, he won almost all of them easily; however, many Democrats like James Roosevelt opposed his candidacy and urged former Chief of Staff of the United States Army Dwight D. Eisenhower to run instead.
Truman wanted U.S. Supreme Court Associate Justice William O. Douglas to be his running mate. Douglas declined, claiming a lack of political experience; in reality, his friend Thomas Gardiner Corcoran had advised him not to be a "number two man to a number two man". Senator Barkley's keynote address at the 1948 Democratic National Convention energized the delegates and impressed Truman, who then selected Barkley as his running mate. When the convention adopted Truman's civil rights plank in a close vote of 651+1⁄2 to 582+1⁄2, many Southern delegates walked out of the convention. After order was restored, a roll call vote gave Truman a majority of delegates to be the nominee; Barkley was nominated the vice-presidential candidate by acclamation. (Full article...)

Spalding War Memorial is a First World War memorial in the gardens of Ayscoughfee Hall (pronounced /ˈæskəˌfiː/) in Spalding, Lincolnshire, in eastern England. It was designed by the architect Sir Edwin Lutyens. The proposal for a memorial to Spalding's war dead originated in January 1918 with Barbara McLaren, whose husband and the town's Member of Parliament, Francis McLaren, was killed in a flying accident during the war. She engaged Lutyens via a family connection and the architect produced a plan for a grand memorial cloister surrounding a circular pond, in the middle of which would be a cross. The memorial was to be built in the formal gardens of Ayscoughfee Hall, which was owned by the local district council. When McLaren approached the council with her proposal, it generated considerable debate within the community and several alternative schemes were suggested. After a public meeting and a vote in 1919, a reduced-scale version of McLaren's proposal emerged as the preferred option, in conjunction with a clock on the town's corn exchange building.
The total cost of the memorial was £3,500, of which McLaren and her father-in-law contributed £1,000 each; her brother-in-law donated a pair of painted stone flags and the remainder was raised from voluntary subscription, which took until 1922. The memorial consists of a brick pavilion at the south end of the garden and a Stone of Remembrance, both at the head of a long reflecting pool, which incorporates the remains of an 18th-century canal. It was unveiled at a ceremony on 9 June 1922. Lutyens went on to use the style of the pavilion for shelter buildings in several war cemeteries on the Western Front, though none of his other war memorials follow the design and the memorial became relatively obscure. Spalding War Memorial is today a Grade I listed building, having been upgraded when Lutyens's war memorials were declared a "national collection" and all were granted listed building status or had their listing renewed. (Full article...)
.jpg)
The Great Western Railway War Memorial is a First World War memorial by Charles Sargeant Jagger and Thomas S. Tait. It stands on platform 1 at London Paddington station, commemorating the 2,500 employees of the Great Western Railway (GWR) who were killed in the conflict. One-third of the GWR's workforce of almost 80,000 left to fight in the First World War, the company guaranteeing their jobs, and the GWR gave over its workshops for munitions manufacturing as well as devoting its network to transporting soldiers and military equipment. The company considered several schemes for a war memorial before approaching Jagger to design a statue. Some officials continued to push for an alternate design, to the point that Jagger threatened to resign. Jagger was working on several other war memorial commissions at the same time as the GWR's, including his most famous, the Royal Artillery Memorial.
The memorial consists of a bronze statue of a soldier, dressed in heavy winter clothing, reading a letter from home. The statue stands on platform 1 of Paddington station, on a polished granite plinth within a white stone surround. The names of the dead were recorded on a roll that was buried underneath the plinth. Viscount Churchill, the company chairman, unveiled the memorial on 11 November 1922, in front of the Archbishop of Canterbury, GWR officials, and more than 6,000 relatives of the dead. Such was the expected size of the crowd that the GWR built viewing stands across two platforms and the tracks in between them. (Full article...)

The Timor Leste Defence Force (Tetum: Forcas Defesa Timor Lorosae, Portuguese: Forças de Defesa de Timor Leste or Falintil-FDTL, often F-FDTL) is the military of East Timor. The F-FDTL was established in February 2001 and comprises two infantry battalions, small naval and air components and several supporting units.
The F-FDTL's primary role is to protect East Timor from external threats. It also has an internal security role, which overlaps with that of the Polícia Nacional de Timor-Leste (PNTL). This overlap has led to tensions between the services, which have been exacerbated by poor morale and lack of discipline within the F-FDTL. (Full article...)
During its first months at Darwin, No. 1 Wing intercepted several of the air raids conducted against Northern Australia by the Imperial Japanese Army Air Force and Imperial Japanese Navy. Although the wing was hampered by mechanical problems with its Spitfires and suffered heavy losses in some engagements, it eventually downed more Japanese aircraft than it lost in combat. After the final Japanese air raid on northern Australia in November 1943, No. 1 Wing saw little combat, which led to its personnel suffering from low morale. The wing's two Australian flying squadrons were replaced with British units in July 1944, and subsequent proposals to move these squadrons to more active areas were not successful. (Full article...)

SMS Gneisenau was an armored cruiser of the German Kaiserliche Marine (Imperial Navy), part of the two-ship Scharnhorst class. Named for the earlier screw corvette of the same name, the ship was laid down in June 1904 at the AG Weser shipyard in Bremen, launched in June 1906, and commissioned in March 1908. She was armed with a main battery of eight 21 cm (8.3 in) guns, a significant increase in firepower over earlier German armored cruisers, and she had a top speed of 22.5 knots (42 km/h; 26 mph). Gneisenau initially served with the German fleet in I Scouting Group, though her service there was limited owing to the British development of the battlecruiser by 1909, which the less powerful armored cruisers could not effectively combat.
Accordingly, Gneisenau was assigned to the German East Asia Squadron, where she joined her sister ship Scharnhorst. The two cruisers formed the core of the squadron, which included several light cruisers. Over the next four years, Gneisenau patrolled Germany's colonial possessions in Asia and the Pacific Ocean. She also toured foreign ports to show the flag and monitored events in China during the Xinhai Revolution in 1911. Following the outbreak of World War I in July 1914, the East Asia Squadron, under the command of Vice Admiral Maximilian von Spee, crossed the Pacific to the western coast of South America, stopping for Gneisenau and Scharnhorst to attack French Polynesia in the Bombardment of Papeete in September. (Full article...)
Born and raised in the United States, Bradburn's first career was as a merchant and slave trader. He likely first entered Mexico in 1812 as part of the Gutiérrez–Magee Expedition fighting Spanish control of Texas. When the expedition was quashed, Bradburn moved to Louisiana, where he served in the Louisiana militia during the Battle of New Orleans. After his discharge, Bradburn spent several years fighting for Mexican independence. After Spain relinquished its hold on Mexico in 1821, Bradburn became an officer in the new Mexican Army, in which he served as a courier for Emperor Agustín de Iturbide. (Full article...)
Featured picture
-
 Photo credit: USHMMJews captured by SS and SD troops during the suppression of the Warsaw Ghetto Uprising are forced to leave their shelter and march to the Umschlagplatz for deportation. The SD trooper pictured second from the right, is Josef Blösche, who was identified by Polish authorities using this photograph. Blösche was tried for war crimes in Erfurt, East Germany in 1969, sentenced to death and executed in July of that year.
 -
 Illustration: Anton Sorg; Restoration: Lise BroerA knight, a member of the warrior class of the Middle Ages in Europe, in Gothic plate armour, from a German book illustration published 1483. The modern concept of the knight is as an elite warrior sworn to uphold the values of chivalry, faith, loyalty, courage and honour. Knighthood as known in Medieval Europe was characterized by the combination of two elements: feudalism and service as a mounted combatant. Both arose under the reign of the Holy Roman Emperor Charlemagne, from which the knighthood of the Middle Ages can be seen to have had its genesis.
 -
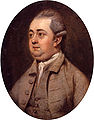 Painting: Henry WaltonEdward Gibbon (1737–1794) was an English historian who published The History of the Decline and Fall of the Roman Empire in six volumes between 1776 and 1788. Born in Putney, Surrey, he became a voracious reader while being raised by his aunt, and was sent to study at Magdalen College, Oxford, and in Switzerland. Returning to England, in 1761 Gibbon published his first book, Essai sur l'Étude de la Littérature. This was well received, but Gibbon's next book was a failure. In the early 1770s Gibbon began writing his history of the Roman Empire, which was received with great praise.
 -
 Ivan the Terrible Showing His Treasury to Jerome HorseyArtist: Alexander LitovchenkoAlexander Litovchenko's 1875 painting depicting Ivan IV of Russia seated in the Kremlin Armoury, his half-witted heir Fyodor standing behind, a group of distrustful boyars whispering at a distance, and the Tsar's jester in a skomorokh cap addressing the English diplomat Jerome Horsey. Horsey was a resident of the Russia Company in Moscow from 1572 to 1585.
 -
 "The Trumpet Calls", a recruitment poster for the Australian Army in World War I. When the United Kingdom declared war on Germany, Australia followed without hesitation. This was considered to be expected by the Australian public, because of the very large number of British-born citizens and first generation Anglo-Australians at the time. A total of 331,814 Australians were sent overseas to serve as part of the Australian Imperial Force with a casualty rate (killed or wounded) of 64%.
 -
 The "Theatre" at PetraPhoto: Douglas PerkinsPetra is an archaeological site in Jordan, lying in a basin among the mountains which form the eastern flank of Wadi Araba, the great valley running from the Dead Sea to the Gulf of Aqaba. It is famous for having many stone structures carved into the rock.
 -
 Photo credit: Gustaf NordenskiöldAn 1891 photograph of Cliff Palace, the largest cliff dwelling—a structure built within caves and under outcroppings in cliffs—in North America, located in what is now Mesa Verde National Park, Colorado, USA. There are about 150 rooms in the 288 ft (88 m) long structure, although only 25 to 30 of those were used as living space by Ancient Pueblo Peoples. it is estimated that the population of Cliff Palace was roughly 100–150 people.
 -
 Poster credit: Breuker & Kessler, Co.A World War I-era poster sponsored by the United States Department of Agriculture encouraging children to raise sheep to provide wool for the war effort. The poster reads, "Twenty sheep to clothe and equip each soldier / Boys and girls can help / Join a sheep club".
 -
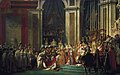 Painting by Jacques-Louis David and Georges RougetThe Coronation of Napoleon, a painting by Jacques-Louis David depicting Napoleon Bonaparte's self-coronation as Emperor of France on December 2, 1804. The act took place in Notre-Dame de Paris, during which Napoleon, eschewing tradition, took the crown and placed it on his own head. The nearly 10 by 6 m (32.8 by 19.7 ft) work was commissioned before the coronation and completed in 1807.
 -
 Lithography: Day & Son; Restoration: Jake WartenbergAn 1856 lithograph of the Selimiye Barracks, located in Istanbul, Turkey, being used as a hospital during the Crimean War. Florence Nightingale's experiences here during this time helped her develop the foundations of modern nursing. As such, the barracks now contain a museum dedicated to her and her staff.
 -
 Artist: William Simpson; Restoration: Lise BroerA lithograph of a watercolour painting depicting soldiers transporting winter clothing, lumber for huts, and other supplies through a snow-covered landscape, with partially buried dead horses along the roadside, to the British camps, during the Siege of Sevastopol of the Crimean War. In the winter, a storm ruined the camps and supply lines of the Allied forces (France, Britain and the Ottoman Empire). Men and horses became sick and starved in the poor conditions.
 -
 A Chola dynasty sculpture depicting Shiva. In Hinduism, Shiva is the deity of destruction and one of the most important gods; in this sculpture he is dancing as Nataraja, the divine dancer who unravels the world in preparation for it being remade by Brahma.
 -
 Photograph: Felice BeatoA samurai with his sword and armor, photographed by Felice Beato c. 1860. The samurai, records of which date back to the early 10th-century Kokin Wakashū, were the military nobility of medieval and early-modern Japan. As Japan modernized during the Meiji period beginning in the late 1860s, the samurai lost much of their power, and the status was ultimately dissolved. However, samurai values remain common in Japanese society.
 -
![Image 14 Apollo 11 Photograph credit: Neil Armstrong Apollo 11 was the fifth crewed mission of NASA's Apollo program. After launching from the Kennedy Space Center in Florida on July 16, 1969, commander Neil Armstrong and Apollo Lunar Module pilot Buzz Aldrin landed Eagle in Mare Tranquillitatis on July 20, at 20:17:40 UTC, while command module pilot Michael Collins remained on Columbia in lunar orbit. Armstrong was the first to exit the spacecraft, stepping onto the surface 6 hours and 39 minutes later, on July 21, at 02:56:15 UTC; nineteen minutes later, Aldrin joined him on extravehicular activity, which lasted 2 hours, 31 minutes and 40 seconds. Armstrong and Aldrin lifted off from Tranquility Base after almost 22 hours on the lunar surface and rejoined Collins in the command module, before splashing down in the Pacific Ocean on July 24. The mission was planned to the minute, with the majority of the photographic tasks performed by Armstrong with a single Hasselblad camera. Most of the photographs taken on the Moon that include an astronaut are of Aldrin; there are only five images of Armstrong partly shown or reflected, as in this photograph, with Armstrong and the lunar module reflected in Aldrin's helmet visor. "As the sequence of lunar operations evolved," Aldrin explained, "Neil had the camera most of the time [...] It wasn't until we were back on Earth and in the Lunar Receiving Laboratory looking over the pictures that we realized there were few pictures of Neil." More featured pictures](//upload.wikimedia.org/wikipedia/commons/thumb/9/98/Aldrin_Apollo_11_original.jpg/119px-Aldrin_Apollo_11_original.jpg) Photograph credit: Neil ArmstrongApollo 11 was the fifth crewed mission of NASA's Apollo program. After launching from the Kennedy Space Center in Florida on July 16, 1969, commander Neil Armstrong and Apollo Lunar Module pilot Buzz Aldrin landed Eagle in Mare Tranquillitatis on July 20, at 20:17:40 UTC, while command module pilot Michael Collins remained on Columbia in lunar orbit. Armstrong was the first to exit the spacecraft, stepping onto the surface 6 hours and 39 minutes later, on July 21, at 02:56:15 UTC; nineteen minutes later, Aldrin joined him on extravehicular activity, which lasted 2 hours, 31 minutes and 40 seconds. Armstrong and Aldrin lifted off from Tranquility Base after almost 22 hours on the lunar surface and rejoined Collins in the command module, before splashing down in the Pacific Ocean on July 24.
Photograph credit: Neil ArmstrongApollo 11 was the fifth crewed mission of NASA's Apollo program. After launching from the Kennedy Space Center in Florida on July 16, 1969, commander Neil Armstrong and Apollo Lunar Module pilot Buzz Aldrin landed Eagle in Mare Tranquillitatis on July 20, at 20:17:40 UTC, while command module pilot Michael Collins remained on Columbia in lunar orbit. Armstrong was the first to exit the spacecraft, stepping onto the surface 6 hours and 39 minutes later, on July 21, at 02:56:15 UTC; nineteen minutes later, Aldrin joined him on extravehicular activity, which lasted 2 hours, 31 minutes and 40 seconds. Armstrong and Aldrin lifted off from Tranquility Base after almost 22 hours on the lunar surface and rejoined Collins in the command module, before splashing down in the Pacific Ocean on July 24.
The mission was planned to the minute, with the majority of the photographic tasks performed by Armstrong with a single Hasselblad camera. Most of the photographs taken on the Moon that include an astronaut are of Aldrin; there are only five images of Armstrong partly shown or reflected, as in this photograph, with Armstrong and the lunar module reflected in Aldrin's helmet visor. "As the sequence of lunar operations evolved," Aldrin explained, "Neil had the camera most of the time [...] It wasn't until we were back on Earth and in the Lunar Receiving Laboratory looking over the pictures that we realized there were few pictures of Neil." -
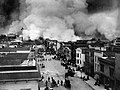 Photo credit: H. D. ChadwickThe Mission District of San Francisco, California, burning in the aftermath of the 1906 San Francisco earthquake. As damaging as the earthquake and its aftershocks were, the fires that burned out of control afterward were much more destructive.
 -
 Artist: William Simpson; Restoration: Adam CuerdenOn October 25, 1854, during the Battle of Balaclava in the Crimean War, British cavalry units charged heavily fortified Russian opposition, an action known as the Charge of the Light Brigade. By mischance, they attacked the wrong target, as the orders were unclear, and as a result suffered great casualties. Alfred, Lord Tennyson's famous poem made the charge a symbol of warfare at both its most courageous and its most tragic.
 -
 Painting by Benjamin HaydonBenjamin Haydon's painting of Thomas Clarkson addressing the 1840 Anti-Slavery Convention, held by the Anti-Slavery Society at Exeter Hall in London. The organisation was the second to bear that name and was dedicated to the abolishment of slavery worldwide. It continues to function today as Anti-Slavery International.
 -
 Woodcut: Hans Burgkmair; print: David de NegkerA woodcut print of the Quaternion Eagle, the double-headed eagle armorial of the Holy Roman Empire. It showed the shields of the various parts of the empire in groups of four on the feathers of the eagle supporting, in place of a shield, Christ on the True Cross. The top, larger shields, are those of the seven Prince-electors, as well as one for the titular "Prefect of Rome".


![Image 14 Apollo 11 Photograph credit: Neil Armstrong Apollo 11 was the fifth crewed mission of NASA's Apollo program. After launching from the Kennedy Space Center in Florida on July 16, 1969, commander Neil Armstrong and Apollo Lunar Module pilot Buzz Aldrin landed Eagle in Mare Tranquillitatis on July 20, at 20:17:40 UTC, while command module pilot Michael Collins remained on Columbia in lunar orbit. Armstrong was the first to exit the spacecraft, stepping onto the surface 6 hours and 39 minutes later, on July 21, at 02:56:15 UTC; nineteen minutes later, Aldrin joined him on extravehicular activity, which lasted 2 hours, 31 minutes and 40 seconds. Armstrong and Aldrin lifted off from Tranquility Base after almost 22 hours on the lunar surface and rejoined Collins in the command module, before splashing down in the Pacific Ocean on July 24. The mission was planned to the minute, with the majority of the photographic tasks performed by Armstrong with a single Hasselblad camera. Most of the photographs taken on the Moon that include an astronaut are of Aldrin; there are only five images of Armstrong partly shown or reflected, as in this photograph, with Armstrong and the lunar module reflected in Aldrin's helmet visor. "As the sequence of lunar operations evolved," Aldrin explained, "Neil had the camera most of the time [...] It wasn't until we were back on Earth and in the Lunar Receiving Laboratory looking over the pictures that we realized there were few pictures of Neil." More featured pictures](/wiki/File:Aldrin_Apollo_11_original.jpg)


Did you know (auto generated)

- ... that the Picts disappeared from the historical record after the devastation suffered following the Battle of Dollar?
- ... that the Suwałki Gap is often described as the modern version of the Cold War–era Fulda Gap, a NATO vulnerability of historical importance?
- ... that Fairleigh Dickinson's upset victory over Purdue was the biggest upset in terms of point spread in NCAA tournament history, with Purdue being a 23+1⁄2-point favorite?
- ... that Lucien Laurent scored the first goal in FIFA World Cup history during the inaugural game of Group 1 of the 1930 World Cup?
- ... that one of the longest civil trials in Utah history, with 1,000 exhibits, concerned the purchase of a Salt Lake City TV station?
- ... that the compilation of the Wu shu was hampered by the execution of two members of the committee compiling the text?
Featured biography –

Sir Frank Macfarlane Burnet OM AK KBE FRS FAA FRSNZ (3 September 1899 – 31 August 1985), usually known as Macfarlane or Mac Burnet, was an Australian virologist known for his contributions to immunology. He won a Nobel Prize in 1960 for predicting acquired immune tolerance and he developed the theory of clonal selection.
Burnet received his Doctor of Medicine degree from the University of Melbourne in 1924, and his PhD from the University of London in 1928. He went on to conduct pioneering research in microbiology and immunology at the Walter and Eliza Hall Institute of Medical Research, Melbourne, and served as director of the Institute from 1944 to 1965. From 1965 until his retirement in 1978, Burnet worked at the University of Melbourne. Throughout his career he played an active role in the development of public policy for the medical sciences in Australia and was a founding member of the Australian Academy of Science (AAS), and served as its president from 1965 to 1969. (Full article...)On this day
.jpg)
- AD 9 – Germanic Wars: An alliance of Germanic tribes led by Arminius engaged Roman forces at the Battle of the Teutoburg Forest, defeating three legions within a few days.
- 1141 – Yelü Dashi, the Liao general who founded the Qara Khitai, defeated Seljuq and Kara-Khanid forces at the Battle of Qatwan, near Samarkand in present-day Uzbekistan.
- 1796 – French Revolutionary Wars: A naval engagement between French and British fleets off the coast of Sumatra ended inconclusively.
- 1954 – A magnitude-6.7 earthquake struck near Chlef, killing over 1,200 people and forcing the Algerian government to implement comprehensive reforms in building codes.
- 1971 – Imagine, the second solo album by John Lennon (pictured), was released.
- Honorius (b. 384)
- James Clark (d. 1885)
- Gan Eng Seng (d. 1899)
- Soňa Červená (b. 1925)
Selected quote
As long as I breathe I hope. As long as I breathe I shall fight for the future, that radiant future, in which man, strong and beautiful, will become master of the drifting stream of his history and will direct it towards the boundless horizons of beauty, joy and happiness!
— Leon Trotsky, 20th century Russian revolutionary
Related portals
More Did you know...

- ... that the Soviet Tupolev Tu-142 (pictured) maritime patrol aircraft was developed in response to the American UGM-27 Polaris submarine-launched ballistic missile?
- ... that Harry Powers said that watching his victims die was more fun than a brothel?
- ... that the effort put forth by the subject of Miró's 1937 Naked woman climbing a staircase and her heavy limbs are thought to reflect the tragedy of the Spanish Civil War?
- ... that 49% of German military losses happened in the last 10 months of the Second World War in Europe?
- ... that Thomas Edison lost a fortune in his ore-milling company, but "had a hell of a good time spending it"?
- ... that American McCaull Comic Opera Company actress May Yohé, once the owner of the Hope Diamond, died poor?
- ... that Egyptian political cartoonist Ahmad Nady took part in the 2011 Egyptian revolution, drawing cartoons while he demonstrated?
- ... that finds unearthed at the Israelite Tower in Jerusalem's Jewish Quarter attest to the Babylonian sack of the city in 586 BCE?
Topics
| Primary | |
|---|---|
| Interdisciplinary |
|
| List | |
| Other categorizations | |
| Key concepts | |||||||||
|---|---|---|---|---|---|---|---|---|---|
| Measurement and standards |
| ||||||||
| Philosophy of time | |||||||||
| Human experience and use of time | |||||||||
| Time in science |
| ||||||||
| Related | |||||||||
Categories

History • By period • By region • By topic • By ethnic group • Historiography • Archaeology • Books • Maps • Images • Magazines • Organizations • Fictional • Museums • Pseudohistory • Stubs • Timelines • Chronology • People • Wikipedia historians
WikiProjects
![]() WikiProject History •
Ancient Near East • Australian History • Classical Greece and Rome • Dacia • Former countries • History of Canada • Chinese history • European history • Heraldry and vexillology • Indian history • Jewish history • Medieval Scotland • Mesoamerica • Military history • Middle Ages • History of Science
WikiProject History •
Ancient Near East • Australian History • Classical Greece and Rome • Dacia • Former countries • History of Canada • Chinese history • European history • Heraldry and vexillology • Indian history • Jewish history • Medieval Scotland • Mesoamerica • Military history • Middle Ages • History of Science
WikiProject Time • Days of the Year • Years
WikiProject Biography • Composers • Political figures • Saints • United States Presidents
Things you can do
 |
Here are some tasks awaiting attention:
|
Associated Wikimedia
The following Wikimedia Foundation sister projects provide more on this subject:
-
 Commons
Free media repository -
 Wikibooks
Free textbooks and manuals -
 Wikidata
Free knowledge base -
 Wikinews
Free-content news -
 Wikiquote
Collection of quotations -
 Wikisource
Free-content library -
 Wikiversity
Free learning tools -
 Wiktionary
Dictionary and thesaurus


